Setting up a VPN on AWS
This is something that took me a few hours to get right. These steps will get you going in a lot less time.
I’m going to skip over how to setup a VPC. You should read Amazon’s Getting Started with Amazon VPC guide for that.
First off, make sure you have an EC2 instance running in your VPC with an elastic IP. Also make sure that it’s able to reach the Internet. I’m using Ubuntu but this should work for Debian and CentOS as well.
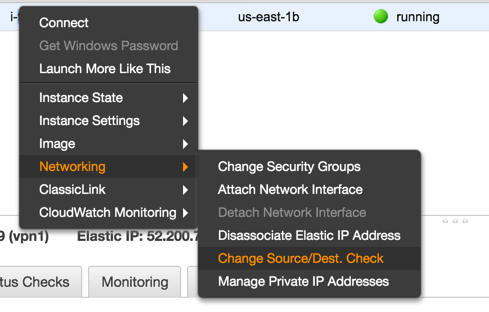
Disable Source/Destination Check
Each EC2 instance performs source/destination checks by default. This means that the instance must be the source or destination of any traffic it sends or receives. However, a NAT instance must be able to send and receive traffic when the source or destination is not itself. Therefore, you must disable source/destination checks on the NAT instance.
OpenVPN installer
I used https://github.com/Nyr/openvpn-install to install OpenVPN. Simply download the script and follow the instructions. You need to run this as root.
When you get to the following prompt, enter in your elastic IP.
Looks like your server is behind a NAT!

If your server is NATed (e.g. LowEndSpirit), I need to know the external IP
If that's not the case, just ignore this and leave the next field blank
External IP: <Elastic IP>
Allow VPN traffic
Allow UDP traffic on port 1194.
Finally, you’ll end up with a .ovpn file. Save that file locally and use it with your favorite VPN
client. I like Tunnelblick.
Internal DNS
This is a bonus step. Add the following line to your .ovpn file to add your VPC DNS server to your
local resolver list.
dhcp-option DNS 10.0.0.2
This does fancy stuff like resolve public EC2 DNS addresses to internal IPs, e.g.
ec2-52-200-72-147.compute-1.amazonaws.com resolves to 10.0.0.253.